In SwiftUI, TimelineView provides a powerful and efficient way to handle views that require regular updates based on time. This blog post…
Utilizing TimelineView for Time-Based Updates in SwiftUI
In SwiftUI, TimelineView provides a powerful and efficient way to handle views that require regular updates based on time. This blog post will delve deep into the intricacies of TimelineView, showcasing how to build a clock and a countdown timer, complete with working code samples and unit tests.
Introduction to TimelineView
TimelineView is designed for views that need to update periodically. Unlike manually managing timers, TimelineView ensures updates are handled efficiently by the system, reducing power consumption and improving performance.
TimelineView can be initialized with two main modes:
1. .animation(minimumInterval:paused:) — Updates the view based on the animation system.
2. .periodic(from:by:) — Updates the view at fixed intervals.
Example: Building a Clock
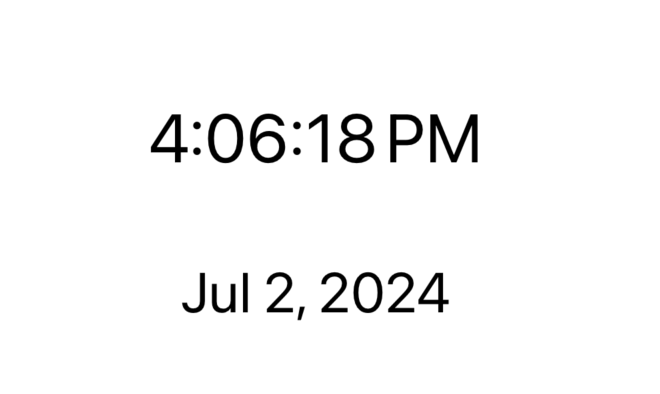
A clock is a classic example of a time-sensitive component. Here’s how you can build a simple clock using TimelineView.
Code Implementation
import SwiftUI

struct ClockView: View {
    var body: some View {
        TimelineView(.animation(minimumInterval: 1.0, paused: false)) { context in
            let date = context.date
            VStack {
                Text(dateFormatter.string(from: date))
                    .font(.largeTitle)
                    .padding()
                Text(dateOnlyFormatter.string(from: date))
                    .font(.title)
                    .padding()
            }
        }
    }

    private var dateFormatter: DateFormatter {
        let formatter = DateFormatter()
        formatter.timeStyle = .medium
        return formatter
    }

    private var dateOnlyFormatter: DateFormatter {
        let formatter = DateFormatter()
        formatter.dateStyle = .medium
        return formatter
    }
}

#Preview {
  ClockView()
}
In this implementation:
• TimelineView updates every second (minimumInterval: 1.0).
• dateFormatter and dateOnlyFormatter are used to format the current date and time.
Explanation
- TimelineView(.animation(minimumInterval: 1.0, paused: false)): This initializes TimelineView to update every second. The paused parameter is set to false to ensure continuous updates.
- context.date: Provides the current date and time for each update cycle.
Example: Building a Countdown Timer
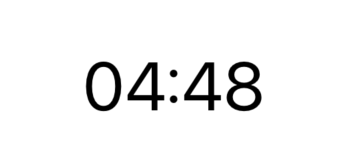
A countdown timer continuously updates to show the remaining time until a specified end date.
Code Implementation
import SwiftUI

struct CountdownTimerView: View {
    let endDate: Date

    var body: some View {
        TimelineView(.periodic(from: Date(), by: 1.0)) { context in
            let currentDate = context.date
            let remainingTime = endDate.timeIntervalSince(currentDate)
            let minutes = Int(remainingTime) / 60
            let seconds = Int(remainingTime) % 60

            VStack {
                Text(String(format: "%02d:%02d", minutes, seconds))
                    .font(.largeTitle)
                    .padding()
            }
        }
    }
}

#Preview {
  CountdownTimerView(endDate: Date().addingTimeInterval(300))
}
In this implementation:
• TimelineView updates every second.
• The remaining time is calculated and displayed in minutes and seconds.
Explanation
• TimelineView(.periodic(from: Date(), by: 1.0)): This initializes TimelineView to update every second starting from the current date.
• endDate.timeIntervalSince(currentDate): Calculates the remaining time until endDate.
Unit Tests
Testing views that rely on TimelineView involves verifying the logic used within these views.
Testing ClockView
For ClockView, we can test that the view correctly formats the date and time.
import XCTest
import SwiftUI
@testable import YourApp

class ClockViewTests: XCTestCase {

    func testClockViewFormatting() {
        let view = ClockView()
        let controller = UIHostingController(rootView: view)

        // Simulate view rendering and extracting the current date and time
        let expectedTime = view.dateFormatter.string(from: Date())
        let expectedDate = view.dateOnlyFormatter.string(from: Date())

        // Extracting displayed texts
        let timeText = extractText(from: controller, with: view.dateFormatter)
        let dateText = extractText(from: controller, with: view.dateOnlyFormatter)

        XCTAssertEqual(timeText, expectedTime, "ClockView should display the current time.")
        XCTAssertEqual(dateText, expectedDate, "ClockView should display the current date.")
    }

    private func extractText(from controller: UIHostingController<ClockView>, with formatter: DateFormatter) -> String {
        // This function should extract the displayed text from the UIHostingController.
        // Implement the extraction logic here.
    }
}
Testing CountdownTimerView
For CountdownTimerView, we verify that the countdown logic is correct.
import XCTest
import SwiftUI
@testable import YourApp

class CountdownTimerViewTests: XCTestCase {

    func testCountdownLogic() {
        let futureDate = Date().addingTimeInterval(120) // 2 minutes from now
        let view = CountdownTimerView(endDate: futureDate)
        let controller = UIHostingController(rootView: view)

        // Simulate view rendering and extracting the countdown time
        let remainingTime = futureDate.timeIntervalSince(Date())
        let expectedMinutes = Int(remainingTime) / 60
        let expectedSeconds = Int(remainingTime) % 60
        let expectedTime = String(format: "%02d:%02d", expectedMinutes, expectedSeconds)

        // Extracting displayed text
        let displayedTime = extractText(from: controller)

        XCTAssertEqual(displayedTime, expectedTime, "CountdownTimerView should display the remaining time correctly.")
    }

    private func extractText(from controller: UIHostingController<CountdownTimerView>) -> String {
        // This function should extract the displayed text from the UIHostingController.
        // Implement the extraction logic here.
    }
}
Conclusion
Using TimelineView in SwiftUI provides a robust and efficient way to manage time-based updates. Whether building a clock, a countdown timer, or other time-sensitive components, TimelineView ensures smooth and efficient updates. By integrating comprehensive unit tests, you can ensure the correctness and reliability of your time-sensitive views, enhancing the overall quality of your SwiftUI applications.
This detailed exploration of TimelineView provides you with the tools and knowledge to create dynamic and time-sensitive components in SwiftUI.
If you want to learn more about native mobile development, you can check out the other articles I have written here: https://medium.com/@wesleymatlock
Happy coding! 🚀
By Wesley Matlock on June 25, 2024.
Exported from Medium on May 10, 2025.