If you’re building any app that handles sensitive data — whether it’s a banking app, a health tracker, or even a social platform — security…
Master of Secrets: Securing Your App with SwiftUI

If you’re building any app that handles sensitive data — whether it’s a banking app, a health tracker, or even a social platform — security isn’t just a feature; it’s the foundation. It’s like the backstage at a Metallica concert: tightly controlled, fiercely guarded, and with absolutely no room for slack. Users are trusting you with their most precious information, and it’s your job to ensure it’s as untouchable as James Hetfield’s riffs.
So, how do you make sure your app is ready to rock the security stage? Here’s a setlist of hardcore techniques that will keep your app secure while delivering a seamless experience your users can trust:
- Obscure sensitive data with the redacted modifier: Hide account balances, payment details, or private messages until it’s time to reveal them.
- Use SecureField for sensitive input: Automatically mask passwords or PINs and integrate with AutoFill.
- Add biometric authentication: Let Face ID or Touch ID act as the bouncer for your app’s VIP sections, with fallback options for when things don’t go as planned.
- Blur views in the background: Obscure sensitive details when the app is no longer in focus to protect user data in app switchers.
- Secure network requests with HTTPS and certificate pinning: Lock down connections to your server to prevent man-in-the-middle attacks.
Let’s crank up the amp and break these down, step by step, so your app isn’t just functional — it’s rock-solid and ready to earn your users’ trust.
Redacted: Obscure, Don’t Expose
The redacted modifier is your go-to when sensitive data needs to stay under wraps — whether it’s still loading, or you’re waiting to confirm the user’s identity. Picture it: account balances, payment details, or private messages temporarily shielded from prying eyes. It’s not just functional; it’s a slick way to show users that their data is secure until they’re ready to access it. Pair it with smooth animations, and you’ve got yourself a polished UX that’s as classy as it is secure.
import SwiftUI

struct RedactedView: View {
  @State private var isVerified = false
  @State private var balance: String?
  @State private var showDetails = false

  var body: some View {
    VStack {
      if let balance = balance, isVerified {
        VStack {
          Text("Balance: \(balance)")
            .font(.title)
            .fontWeight(.bold)
            .transition(.asymmetric(insertion: .scale(scale: 1.1).combined(with: .opacity), removal: .opacity))
          if showDetails {
            Text("Verified on: \(Date().formatted(date: .long, time: .shortened))")
              .font(.caption)
              .foregroundColor(.secondary)
              .transition(.opacity)
          }
        }
      } else {
        VStack {
          Text("Loading...")
            .redacted(reason: .placeholder)
        }
      }
    }
    .padding()
    .onAppear {
      loadData()
    }
  }

  private func loadData() {
    Task {
      // Simulate network fetch
      try? await Task.sleep(nanoseconds: 2_000_000_000)
      balance = "$72,000"
      withAnimation(.easeInOut(duration: 0.8)) {
        isVerified = true
      }
      try? await Task.sleep(nanoseconds: 1_000_000_000)
      withAnimation(.easeIn(duration: 0.5)) {
        showDetails = true
      }
    }
  }
}

#Preview {
  RedactedView()
}

Explanation
- Why Redacted? It gives a clean, professional UX, signaling to the user that something is hidden while preventing any accidental exposure.
- Dynamic Updates: Pair it with state changes, as shown here, to reveal the information once verification is complete.
- Pro Tip: Use .transition with .animation for a smooth reveal. Subtle motion makes the experience feel polished.
Recommendation
- Always combine redacted with actual data protection mechanisms. While this hides the view, it doesn’t prevent someone from scraping underlying data using debugging tools.
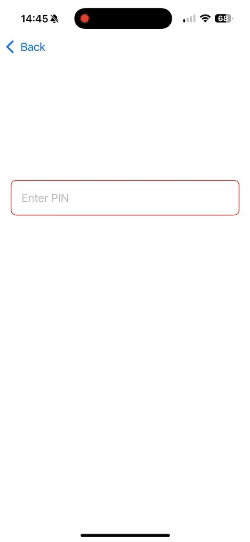
SecureField: Locking Down Input
Whenever users enter sensitive information, like a PIN or password, SecureField is your app’s security MVP. It automatically masks their input — no peeking allowed — and seamlessly integrates with system perks like AutoFill. Think of it as the Kirk Hammett of text fields: reliable, efficient, and absolutely shreds when it comes to keeping things secure. Whether it’s logging in or confirming a transaction, SecureField makes sure your users’ secrets stay exactly that — secret.
import SwiftUI

struct SecureInputView: View {
  @State private var pin: String = ""
  @State private var showPinPreview = false

  var body: some View {
    VStack(spacing: 20) {
        SecureField("Enter PIN", text: $pin)
          .textContentType(.password)
          .padding()
          .background(RoundedRectangle(cornerRadius: 8).strokeBorder(pin.isEmpty ? Color.red : Color.green))
          .overlay(
            Text(showPinPreview ? pin : String(repeating: "•", count: pin.count))
              .font(.caption)
              .foregroundColor(.gray)
              .padding([.top], 40)
              .padding([.leading], 20),
            alignment: .bottomLeading
          )
          .onChange(of: pin) { _, _ in
            withAnimation {
              showPinPreview = pin.count <= 4
            }
          }
   }
    .padding()
  }
}

#Preview {
  SecureInputView()
}
Explanation
- Obscured Input: SecureField automatically masks the input with dots (••••) for security.
- .textContentType: Improves UX by hinting to the system what type of input this field expects (like .password for PINs or passwords).
- Styling: Wrapping it in a styled container makes it visually consistent with your app’s design.
- Dynamic Masking: Shows or hides the entered PIN dynamically for usability.
Recommendation
- Keychain Storage: Never store sensitive input like passwords or PINs directly in memory. Use Apple’s Keychain for safe storage:
let passwordKey = "userPassword"
KeychainWrapper.standard.set(pin, forKey: passwordKey)
- AutoFill: Always set the correct textContentType to allow AutoFill to suggest stored credentials securely.
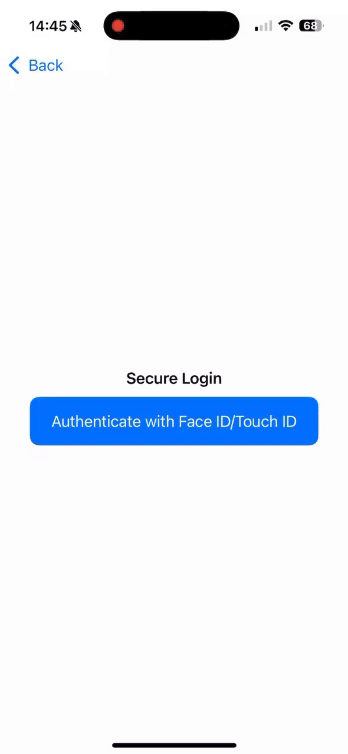
Biometric Authentication: Face ID and Touch ID
Biometric authentication is your app’s backstage bouncer, keeping out the riffraff while letting the right people in with a nod and a smile. It’s fast, reliable, and as cool as James Hetfield downpicking through Master of Puppets — until it doesn’t work. That’s when you need a solid fallback plan because even the best bouncers can have an off day. Whether it’s Face ID or Touch ID, biometrics keep your app feeling futuristic while delivering rock-solid security.
Step 1: Update Info.plist
Before accessing Face ID or Touch ID, your app must explain why it needs biometric authentication. This is a mandatory step enforced by iOS to protect user privacy.
- Open your project in Xcode.
- Navigate to your Info.plist file.
- Add the key NSFaceIDUsageDescription with a descriptive message explaining your app’s use of Face ID.
<key>NSFaceIDUsageDescription</key>
<string>We use Face ID to authenticate you securely and protect your account data.</string>
Step 2: BiometricService Implementation
The BiometricService handles all biometric operations, including policy evaluation, authentication, and error handling. It uses ObservableObject to integrate seamlessly with SwiftUI.
import SwiftUI
import LocalAuthentication

class BiometricService: ObservableObject {
  @Published var isAuthenticated = false
  @Published var authenticationError: String?

  private var context: LAContext?

  func authenticateUser() {
    resetContext()

    guard let context = context else {
      authenticationError = "Failed to initialize authentication context."
      return
    }

    let reason = "Authenticate to access your secure data"
    context.localizedReason = reason
    context.localizedCancelTitle = "Cancel"
    context.localizedFallbackTitle = "Use Passcode"

    if context.canEvaluatePolicy(.deviceOwnerAuthenticationWithBiometrics, error: nil) {
      context.evaluatePolicy(.deviceOwnerAuthenticationWithBiometrics, localizedReason: reason) { [weak self] success, authenticationError in
        DispatchQueue.main.async {
          if success {
            self?.isAuthenticated = true
            self?.authenticationError = nil
          } else if let error = authenticationError as? LAError {
            self?.authenticationError = self?.errorMessage(for: error)
          } else {
            self?.authenticationError = "Unknown authentication error occurred."
          }
        }
      }
    } else {
      DispatchQueue.main.async {
        self.authenticationError = "Biometric authentication is not available on this device."
      }
    }
  }

  private func resetContext() {
    context = LAContext()
    context?.localizedReason = "Authenticate for secure access"
    context?.localizedCancelTitle = "Cancel"
    context?.localizedFallbackTitle = "Use Passcode"
  }

  private func errorMessage(for error: LAError) -> String {
    switch error.code {
    case .authenticationFailed:
      return "Authentication failed. Please try again."
    case .userCancel:
      return "You canceled the authentication."
    case .userFallback:
      return "You chose to use the fallback option."
    case .systemCancel:
      return "The system canceled the authentication."
    case .passcodeNotSet:
      return "Passcode is not set on this device."
    case .biometryNotAvailable:
      return "Biometric authentication is not available on this device."
    case .biometryNotEnrolled:
      return "No biometrics are enrolled on this device."
    case .biometryLockout:
      return "Biometric authentication is locked. Enter your passcode to unlock."
    default:
      return "An unknown error occurred."
    }
  }
}
Step 3: View for Biometric Authentication
This view integrates with BiometricService to provide a secure login interface. It handles user interaction, displays authentication results, and transitions between authenticated and unauthenticated states.
struct BiometricView: View {
  @StateObject private var biometricService = BiometricService()

  var body: some View {
    VStack(spacing: 20) {
      if biometricService.isAuthenticated {
        VStack {
          Text("Welcome, User!")
            .font(.largeTitle)
            .fontWeight(.bold)
            .padding()

          Text("You now have access to secure data.")
            .font(.body)
            .foregroundColor(.secondary)
        }
        .transition(.slide)
      } else {
        VStack(spacing: 10) {
          Text("Secure Login")
            .font(.headline)

          Button(action: {
            biometricService.authenticateUser()
          }) {
            Text("Authenticate with Face ID/Touch ID")
              .padding()
              .frame(maxWidth: .infinity)
              .background(Color.blue)
              .foregroundColor(.white)
              .cornerRadius(10)
          }

          if let errorMessage = biometricService.authenticationError {
            Text(errorMessage)
              .font(.caption)
              .foregroundColor(.red)
              .multilineTextAlignment(.center)
              .padding(.horizontal)
          }
        }
        .padding()
      }
    }
    .padding()
    .animation(.easeInOut, value: biometricService.isAuthenticated)
  }
}

#Preview {
  BiometricView()
}
Explanation
- canEvaluatePolicy: This method verifies whether the device supports biometric authentication and if it’s configured (e.g., Face ID or Touch ID is enabled).
- Fallbacks: The service uses the fallback title (“Use Passcode”) to guide users who either haven’t set up biometrics or prefer not to use them.
- Error Handling: Common errors, such as canceled authentication (userCancel), locked biometrics (biometryLockout), or unavailable biometrics (biometryNotEnrolled), are handled gracefully. The app displays meaningful, user-friendly error messages instead of generic ones, enhancing the user experience.
- Localized Prompts: The code includes custom titles for cancel and fallback options, ensuring the authentication prompt is clear and aligned with the app’s intent.
Recommendation
Show a Clear Message for Biometric Use: The Info.plist key NSFaceIDUsageDescription ensures transparency about why biometric authentication is needed. For example:
“We use Face ID to securely authenticate your account and protect your sensitive data.”
Use the localizedReason property in LAContext to explain why authentication is requested at that specific moment (e.g., “Authenticate to view your secure transactions”).
Combine Biometrics with Session Management: Even after successful biometric authentication, re-authentication should be required for sensitive actions like transferring money or accessing payment details.
Use a timeout mechanism to track the user session and prompt re-authentication after a set duration of inactivity.
Test All Scenarios Thoroughly: Ensure proper behavior when biometrics are unavailable, not enrolled, or locked out. The fallback mechanism (e.g., passcode) should always work as a backup.
Simulate edge cases such as canceling authentication or locking out biometrics to confirm error handling and UI updates.
Blurring Sensitive Views When the App Goes to Background
Picture this: you’re checking your balance on your phone, feeling like a rockstar, and suddenly, someone walks behind you. Or worse, you switch to another app, and your banking details are hanging out in the app switcher like an open mic mistake. Not cool. Let’s crank up the security amp and make sure your app keeps those sensitive details hidden, even when you’re offstage.
import SwiftUI

struct BlurBackground: View {
  @Environment(\.scenePhase) var scenePhase
  @State private var isBlurred = false
  @State private var appSwitcherBlur = false

  var body: some View {
    VStack {
      Text("Account Balance: $72,000")
        .blur(radius: isBlurred ? 10 : 0)
        .animation(.easeInOut, value: isBlurred)
        .background(appSwitcherBlur ? Color.gray.opacity(0.2) : Color.clear)
    }
    .onChange(of: scenePhase) { phase, _ in
      switch phase {
      case .background:
        isBlurred = true
        appSwitcherBlur = true
      case .inactive:
        appSwitcherBlur = true
      default:
        isBlurred = false
        appSwitcherBlur = false
      }
    }
  }
}

#Preview {
    BlurBackground()
}

Explanation
- ScenePhase Detection: The scenePhase environment variable allows you to monitor app lifecycle changes.
- Dynamic Blur: Toggles the blur effect when the app enters the background.
- Lightweight: This doesn’t require UIKit, making it perfect for SwiftUI.
Recommendation
- For complex UIs, consider overlaying a placeholder view (e.g., a company logo) instead of blurring sensitive data.
- Test the experience thoroughly with the multitasking view to ensure no sensitive data leaks.
Secure Network Requests: HTTPS and Certificate Pinning
Network security is like locking the tour bus before heading into a Metallica show — absolutely non-negotiable. Always roll with HTTPS to keep the connection airtight, and for apps handling sensitive data, crank it up a notch with certificate pinning. It’s your app’s way of saying, “No way, not today,” to man-in-the-middle attacks, keeping your users’ data as safe as Lars’ drum kit on tour.
import Foundation
import Security

class NetworkService {

  func makeSecureRequest() {
    guard let url = URL(string: "https://yourbank.com/api/endpoint") else {
      print("Invalid URL")
      return
    }

    // Create a URLSession with a custom delegate for certificate pinning
    let session = URLSession(configuration: .default, delegate: SecureSessionDelegate(), delegateQueue: nil)

    let task = session.dataTask(with: url) { data, response, error in
      if let error = error {
        print("Request failed with error: \(error.localizedDescription)")
        return
      }

      if let httpResponse = response as? HTTPURLResponse {
        print("Response Status Code: \(httpResponse.statusCode)")
      }

      if let data = data, let responseString = String(data: data, encoding: .utf8) {
        print("Response Data: \(responseString)")
      }
    }

    task.resume()
  }

  // Custom URLSessionDelegate for certificate pinning
  class SecureSessionDelegate: NSObject, URLSessionDelegate {
    func urlSession(_ session: URLSession, didReceive challenge: URLAuthenticationChallenge, completionHandler: @escaping (URLSession.AuthChallengeDisposition, URLCredential?) -> Void) {
      guard let serverTrust = challenge.protectionSpace.serverTrust else {
        completionHandler(.cancelAuthenticationChallenge, nil)
        return
      }

      // Retrieve the server's certificate chain
      guard let serverCertificateChain = SecTrustCopyCertificateChain(serverTrust) as? [SecCertificate] else {
        completionHandler(.cancelAuthenticationChallenge, nil)
        return
      }

      // Load the pinned certificate from the app bundle
      let localCertificateData = loadPinnedCertificate()

      // Compare the pinned certificate with the server's certificate
      if let serverCertificate = serverCertificateChain.first {
        let serverCertificateData = SecCertificateCopyData(serverCertificate) as Data
        if localCertificateData == serverCertificateData {
          let credential = URLCredential(trust: serverTrust)
          completionHandler(.useCredential, credential)
          return
        }
      }

      completionHandler(.cancelAuthenticationChallenge, nil)
    }

    private func loadPinnedCertificate() -> Data {
      guard let path = Bundle.main.path(forResource: "yourbank", ofType: "cer"),
            let certData = try? Data(contentsOf: URL(fileURLWithPath: path)) else {
        fatalError("Pinned certificate not found or invalid")
      }
      return certData
    }
  }
}
Explanation
Custom URLSessionDelegate for Certificate Pinning
The core of this implementation is the SecureSessionDelegate, which intercepts authentication challenges through the didReceive delegate method. This is where the certificate pinning magic happens:
- SecTrustCopyCertificateChain:
- Replaces the deprecated SecTrustGetCertificateAtIndex.
- Retrieves the entire certificate chain presented by the server as an array of SecCertificate objects.
- The first certificate in the chain (the “leaf” certificate) is typically the one you compare against your pinned certificate.
Comparing Certificates
- The server’s leaf certificate is compared with your app’s pinned certificate, which is stored as a .cer file in the app bundle.
- SecCertificateCopyData:
- Extracts the raw data of the certificate for a byte-by-byte comparison.
- This ensures a direct match with the pinned certificate, providing protection against fake servers with valid but unrelated certificates.
Loading the Pinned Certificate
The loadPinnedCertificate function reads your pinned certificate (yourbank.cer) from the app bundle. This file is a DER-encoded certificate that you can export from a browser or keychain tool.
Steps to Export a Certificate:
- Open your target website in a browser.
- Inspect the site’s certificate and export it in .cer (DER) format.
- Add the exported certificate to your app bundle.
Handling the Challenge
If the server’s certificate matches your pinned certificate:
- URLCredential: A credential is created with the trusted server’s SecTrust object, allowing the connection to proceed.
If the certificates don’t match:
- The challenge is canceled, preventing the request from completing.
Making the Request
The makeSecureRequest function demonstrates how to create a URLSession with the custom delegate and send a secure request:
- The URLSession ensures only trusted connections succeed.
- Responses and errors are handled asynchronously.
Recommendation
- Use strong error handling to deal with cases like missing certificates or validation failures.
- Regularly update your pinned certificates when the server certificate changes.
- Test this implementation thoroughly using tools like Charles Proxy to ensure certificate pinning blocks unauthorized connections.
Final Thoughts: Ride the Secure Lightning
Keeping your app secure isn’t just a nice-to-have — it’s the ultimate backstage pass to user trust. By jamming together techniques like redacted, SecureField, biometric authentication, and certificate pinning, you’re not just building an app; you’re creating a fortress. One that’s functional, rock-solid, and worthy of headlining the main stage in the world of secure apps.
And hey, next time an interviewer asks you, “How would you secure sensitive data in an app?” you can smile and say, “I’ve got this covered.”
That was a lot of ground to cover — kind of like nailing a perfect Metallica riff. But hey, when it comes to building secure mobile apps, every layer of protection counts. Whether it’s biometric authentication, obfuscation, or securing your app bundle, you’ve now got the tools to take your apps to the next level.
If you’re hungry for more tips, tricks, and a few battle-tested stories from the trenches of native mobile development, swing by my collection of articles: https://medium.com/@wesleymatlock.
These posts are packed with real-world solutions, some laughs, and the kind of knowledge that’s saved me from a few late-night debugging sessions. Let’s keep building apps that rock — and if you’ve got questions or stories of your own, drop me a line. I’d love to hear from you.
Keep coding, stay secure, and crank up the volume! 🚀🤘
By Wesley Matlock on January 21, 2025.
Exported from Medium on May 10, 2025.