You know what’s cool? Turning raw HealthKit data into something visual, like mapping your runs and walks in glorious color. It’s like the…
Mapping Workouts with HealthKit and SwiftUI: A Full Demo

You know what’s cool? Turning raw HealthKit data into something visual, like mapping your runs and walks in glorious color. It’s like the moment a Metallica riff kicks in — you feel it. Back at Nike, I spent a lot of time working with HealthKit, wrangling workout data into features that felt alive. Today, we’re bringing some of that magic into a SwiftUI app that plots routes on a map. Walks will rock a mellow green vibe, runs get a fiery red, and we’ll even sprinkle in some start and end markers, just for kicks.
Setting Up the Project
Before we can map your epic workouts, we need to set up the project in Xcode. This is the boring-but-essential part, like tuning a guitar before jamming — it’s quick, and you’ll thank yourself later.
Create a New Project
- Open Xcode and go to File > New > Project. Don’t overthink it — we’re starting fresh.
- In the template picker, choose App under the iOS tab and hit Next.
- Give your project a name, like RouteMapper. (Or, you know, something cooler.)
• Interface: SwiftUI
• Language: Swift
• Deployment Target: iOS 17 or later (we’re all about the latest and greatest).
- Click Next, pick where to save it, and click Create. Boom, your project is live.
Enable HealthKit
Now that we’ve got the basics in place, let’s give your app permission to work with HealthKit. This step is non-negotiable — no HealthKit, no data.
- In the project navigator on the left, click on your project at the top of the hierarchy (the one with your app’s name).
- Go to the Signing & Capabilities tab.
- Click the + Capability button and type “HealthKit” in the search bar.
- Select HealthKit and click Add. HealthKit is now officially in play.
Update the Privacy Descriptions in the Info Tab
HealthKit is super picky about privacy, and rightfully so. We need to explain why our app wants access to the user’s data. Think of this as writing a polite note to HealthKit saying, “Hey, we need this for a good reason!”
- Select your project in the Navigator on the left and click on your app’s target.
- Go to the Info tab (it’s right next to the Signing & Capabilities tab).
- Scroll down to the section labeled Custom iOS Target Properties (or something similar).
- Click the + button to add a new key, and select Privacy — Health Share Usage Description (NSHealthShareUsageDescription) from the dropdown.
- In the value field, add a user-facing explanation, like:
We use your Health data to display your workout routes on a map.
Now that the stage is set and the lights are up, it’s time to get HealthKit talking to our app. Think of it like getting backstage passes — you can’t just stroll in and start grabbing data; you’ve got to ask nicely. That brings us to the first real step of this journey: getting permission from HealthKit.
Step 1: Permission is Key
HealthKit doesn’t just hand over its secrets — you’ve got to ask nicely. Without permissions, your app will be like a guitar with no strings. Here’s how to set it up.
First, add the HealthKit entitlement in Xcode under Signing & Capabilities. Then, include a privacy policy to keep Apple happy. Next, in your code, we’ll use an actor to keep things clean and thread-safe (because async/await is our jam):
actor HealthKitManager {
    private let healthStore = HKHealthStore()

    func requestAuthorization() async throws {
        let typesToRead: Set = [
            HKObjectType.workoutType(),
            HKSeriesType.workoutRoute()
        ]
        try await withCheckedThrowingContinuation { continuation in
            healthStore.requestAuthorization(toShare: nil, read: typesToRead) { success, error in
                if let error = error {
                    continuation.resume(throwing: error)
                } else {
                    continuation.resume()
                }
            }
        }
    }
}
What’s Happening:
- actor HealthKitManager: This is the brain of our HealthKit operations. Making it an actor means everything runs safely in our multithreaded world.
- Permission Types: We ask for two key pieces of data:
- Workouts (workoutType) for overall details.
- Workout routes (workoutRoute) for GPS data.
- async/await: Apple’s callback-based APIs are so 2015. With async/await, we clean up the code and make it easier to follow.
Once this is in place, you can call requestAuthorization() at the app’s launch:
mport SwiftUI
import HealthKit

actor HealthKitManager {
  private let healthStore = HKHealthStore()

  func requestAuthorization() async throws {
    let typesToRead: Set = [
      HKObjectType.workoutType(),
      HKSeriesType.workoutRoute()
    ]

    try await withCheckedThrowingContinuation { (continuation: CheckedContinuation<Void, Error>) in
      healthStore.requestAuthorization(toShare: nil, read: typesToRead) { success, error in
        if let error = error {
          continuation.resume(throwing: error)
        } else if success {
          continuation.resume()
        } else {
          continuation.resume(throwing: NSError(domain: "HealthKitAuthorization", code: 1, userInfo: [NSLocalizedDescriptionKey: "Authorization was not successful."]))
        }
      }
    }
  }
}
Step 2: Fetch the Goods
Now comes the fun part — grabbing all the walk and run workouts. Each type will get its own color on the map (because who doesn’t love some visual feedback?). Here’s how we fetch workouts and their routes:
extension HealthKitManager {
    func fetchWorkouts() async throws -> [HKWorkout] {
        let predicate = HKQuery.predicateForWorkouts(with: [.walking, .running])
        let sortDescriptor = NSSortDescriptor(key: HKSampleSortIdentifierEndDate, ascending: false)

        return try await withCheckedThrowingContinuation { continuation in
            let query = HKSampleQuery(
                sampleType: .workoutType(),
                predicate: predicate,
                limit: 0,
                sortDescriptors: [sortDescriptor]
            )
            healthStore.execute(query) { _, samples, error in
                if let error = error {
                    continuation.resume(throwing: error)
                } else if let workouts = samples as? [HKWorkout] {
                    continuation.resume(returning: workouts)
                }
            }
        }
    }
}
What’s Happening:
- Filter by Type: HKQuery.predicateForWorkouts(with:) makes sure we’re only grabbing walking and running workouts. Nobody wants to see their yoga class on a map.
- Sort Order: Recent workouts come first, because no one wants to scroll through 2015’s data.
- Wrapping Callbacks: HealthKit’s callback-based query is wrapped in withCheckedThrowingContinuation, so we can use it in our async code.
Step 3: Plot It on a Map
Here’s where it all comes together. We’re using SwiftUI’s Map view to display the routes with different colors for walks and runs. Start and end markers? Check. This is where the app starts feeling alive.
import CoreLocation

extension HealthKitManager {
  func fetchRoute(for workout: HKWorkout) async throws -> [CLLocationCoordinate2D] {
    let workoutRoutePredicate = HKQuery.predicateForObjects(from: workout)
    let workoutRouteType = HKSeriesType.workoutRoute()

    let routes: [HKWorkoutRoute] = try await withCheckedThrowingContinuation { continuation in
      let query = HKSampleQuery(
        sampleType: workoutRouteType,
        predicate: workoutRoutePredicate,
        limit: 0,
        sortDescriptors: nil
      ) { _, samples, error in
        if let error = error {
          continuation.resume(throwing: error)
        } else if let routes = samples as? [HKWorkoutRoute] {
          continuation.resume(returning: routes)
        } else {
          continuation.resume(throwing: NSError(domain: "HealthKitError", code: 1, userInfo: [NSLocalizedDescriptionKey: "No routes found for workout."]))
        }
      }
      healthStore.execute(query)
    }

    guard let route = routes.first else {
      throw NSError(domain: "HealthKitError", code: 1, userInfo: [NSLocalizedDescriptionKey: "No valid route found for workout."])
    }

    return try await withCheckedThrowingContinuation { continuation in
      var coordinates: [CLLocationCoordinate2D] = []

      let query = HKWorkoutRouteQuery(route: route) { _, locations, isFinished, error in
        if let error = error {
          continuation.resume(throwing: error)
          return
        }

        if let locations = locations {
          coordinates.append(contentsOf: locations.map { $0.coordinate })
        }

        if isFinished {
          continuation.resume(returning: coordinates)
        }
      }

      healthStore.execute(query)
    }
  }
}
What’s Happening:
- HKWorkoutRouteQuery: This digs into the workout and pulls out its GPS points.
- Mapping to Coordinates: We take HealthKit’s CLLocation objects and extract the coordinate for use in MapKit.
Step 4: Displaying the Data on a Map
Now for the fun part: showing the route on a map. We’re using SwiftUI’s Map, complete with a polyline for the route, start and end annotations, and a snazzy “Back” button to let users return to the previous screen. This is where the app starts to feel alive.
struct RouteMapView: View {
    let routeCoordinates: [CLLocationCoordinate2D]
    let workoutType: HKWorkoutActivityType

    @State private var mapRegion = MKCoordinateRegion()

    var body: some View {
        Map(coordinateRegion: $mapRegion, annotationItems: annotations) { annotation in
            MapAnnotation(coordinate: annotation.coordinate) {
                Image(systemName: annotation.type == .start ? "flag.fill" : "mappin.circle.fill")
                    .foregroundColor(annotation.type == .start ? .green : .blue)
            }
        }
        .onAppear {
            if let first = routeCoordinates.first {
                mapRegion = MKCoordinateRegion(
                    center: first,
                    span: MKCoordinateSpan(latitudeDelta: 0.01, longitudeDelta: 0.01)
                )
            }
        }
        .overlay {
            MapPolyline(routeCoordinates: routeCoordinates, color: workoutType == .running ? .red : .green)
        }
    }

    private var annotations: [MapAnnotationItem] {
        var annotations = [MapAnnotationItem]()
        if let first = routeCoordinates.first {
            annotations.append(MapAnnotationItem(coordinate: first, type: .start))
        }
        if let last = routeCoordinates.last {
            annotations.append(MapAnnotationItem(coordinate: last, type: .end))
        }
        return annotations
    }
}
What’s Happening:
- Map Setup: The Map component is the star here, using MapPolyline to draw the route with a width of 5 and color-coded based on the workout type (red for running, green for walking).
Start and End Annotations:
- The Annotation view marks the starting point with a blue circle and the finish point with a red circle.
- These annotations dynamically adjust based on the first and last coordinates of the route.
Adjustable Map Region:
- The adjustMapRegion function calculates the bounds of the route to center the map and provide a comfortable zoom level. It uses the min and max latitudes and longitudes to determine the region’s center and span.
Dismiss Button: A simple “Back” button, styled with a capsule background, sits at the top left corner to let users return to the previous screen.
Dynamic Initialization:
- The init method sets the initial mapRegion based on the first coordinate in the route. If no coordinates are available, it defaults to an empty MKCoordinateRegion.
Step 5: Putting It All Together
Now it’s time to bring everything together and create the main screen of our app. This is where we list the workouts pulled from HealthKit, let users select one, and show its route on the map. Think of this as the glue that ties all the pieces together.
We’ll use a NavigationView for easy navigation, a List to display workouts, and a sheet to present the RouteMapView when a workout is selected.
import SwiftUI
import HealthKit
import CoreLocation

struct ContentView: View {
  @State private var workouts: [HKWorkout] = []
  @State private var selectedRouteCoordinates: [CLLocationCoordinate2D] = []
  @State private var selectedWorkoutType: HKWorkoutActivityType = .walking
  @State private var isRouteViewPresented: Bool = false
  @State private var isAuthorized: Bool = false
  @State private var errorMessage: String?

  private let healthKitManager = HealthKitManager()

  var body: some View {
    NavigationView {
      if isAuthorized {
        List(workouts, id: \.uuid) { workout in
          Button(action: {
            loadRoute(for: workout)
          }) {
            Text(workout.workoutActivityType == .running ? "Run" : "Walk")
          }
        }
        .task {
          await fetchWorkouts()
        }
        .navigationTitle("Workouts")
      } else if let errorMessage = errorMessage {
        Text("Error: \(errorMessage)")
          .padding()
      } else {
        Text("Requesting HealthKit Authorization...")
          .task {
            await requestAuthorization()
          }
      }
    }
    .sheet(isPresented: $isRouteViewPresented) {
      RouteMapView(routeCoordinates: $selectedRouteCoordinates, workoutType: selectedWorkoutType)
    }
  }

  private func requestAuthorization() async {
    do {
      try await healthKitManager.requestAuthorization()
      isAuthorized = true
    } catch {
      errorMessage = "Authorization failed: \(error.localizedDescription)"
    }
  }

  private func fetchWorkouts() async {
    do {
      workouts = try await healthKitManager.fetchWorkouts()
    } catch {
      errorMessage = "Error fetching workouts: \(error.localizedDescription)"
    }
  }

  private func loadRoute(for workout: HKWorkout) {
    Task {
      do {
        selectedRouteCoordinates = try await healthKitManager.fetchRoute(for: workout)
        selectedWorkoutType = workout.workoutActivityType

        if selectedRouteCoordinates.isEmpty {
          errorMessage = "No route found for \(workout.workoutActivityType)"
        } else {
          isRouteViewPresented = true
        }
      } catch {
        print("Error fetching route: \(error.localizedDescription)")
      }
    }
  }
}

#Preview {
    ContentView()
}
What’s Happening:
Authorization Workflow:
- The app starts by requesting HealthKit authorization via requestAuthorization().
- If authorization fails, an error message is displayed.
- If successful, the app fetches the workouts and displays them in a list.
Workout List:
- Each workout is displayed as a button in a List.
- Tapping a workout calls loadRoute(for:), which fetches the associated route data and prepares to present it on the map.
Displaying the Map:
- The RouteMapView is presented in a sheet when isRouteViewPresented is set to true.
- The selected route and workout type are passed to RouteMapView as bindings.
Error Handling:
- If fetching workouts or routes fails, the error message is displayed to the user.
- If a route has no coordinates, the app notifies the user instead of opening the map.
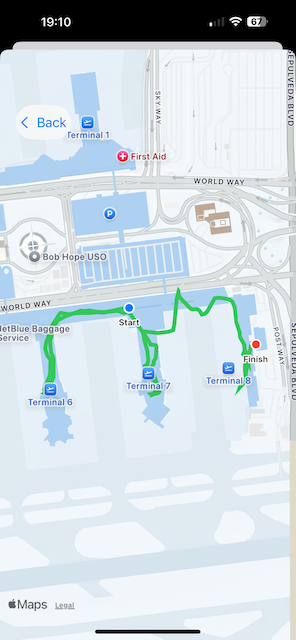
A walk at the airport.
How It Feels in Action
When you launch the app, it asks for HealthKit authorization. Once granted, you’ll see a list of your workouts. Tap one to load its route and open the map. If a route isn’t available, the app lets you know instead of failing silently.
This screen ties everything together, turning your HealthKit data into a visual, interactive experience. Now you can view your workouts and relive those routes in style! 🎉
Final Thoughts
This app is a great foundation for exploring HealthKit’s potential. You’ve got the raw power of workout data, the beauty of route mapping, and plenty of room to grow — like adding elevation profiles or pace overlays. Build, customize, and let those routes rock like a Metallica encore. 🎸
If you want to learn more about native mobile development, you can check out the other articles I have written here: https://medium.com/@wesleymatlock
🚶 Happy Routing! 🏃♂️
By Wesley Matlock on January 8, 2025.
Exported from Medium on May 10, 2025.