
App Attest + DeviceCheck: the backstage crew keeping your app from getting wrecked.
There’s a moment every iOS app hits where trust stops being optional. Your logs start getting weird. Some requests look a little too handcrafted. Maybe someone’s been poking at your endpoints with a patched build. Whatever the reason, you feel that gut punch — the one that tells you your backend deserves better than blind faith.
That’s where App Attest and DeviceCheck step in. They aren’t flashy. They don’t shout. They’re more like the quiet crew backstage during the Load era — leather, confidence, and zero patience for nonsense. They handle the cryptographic heavy lifting while your SwiftUI screens stay smooth and friendly.
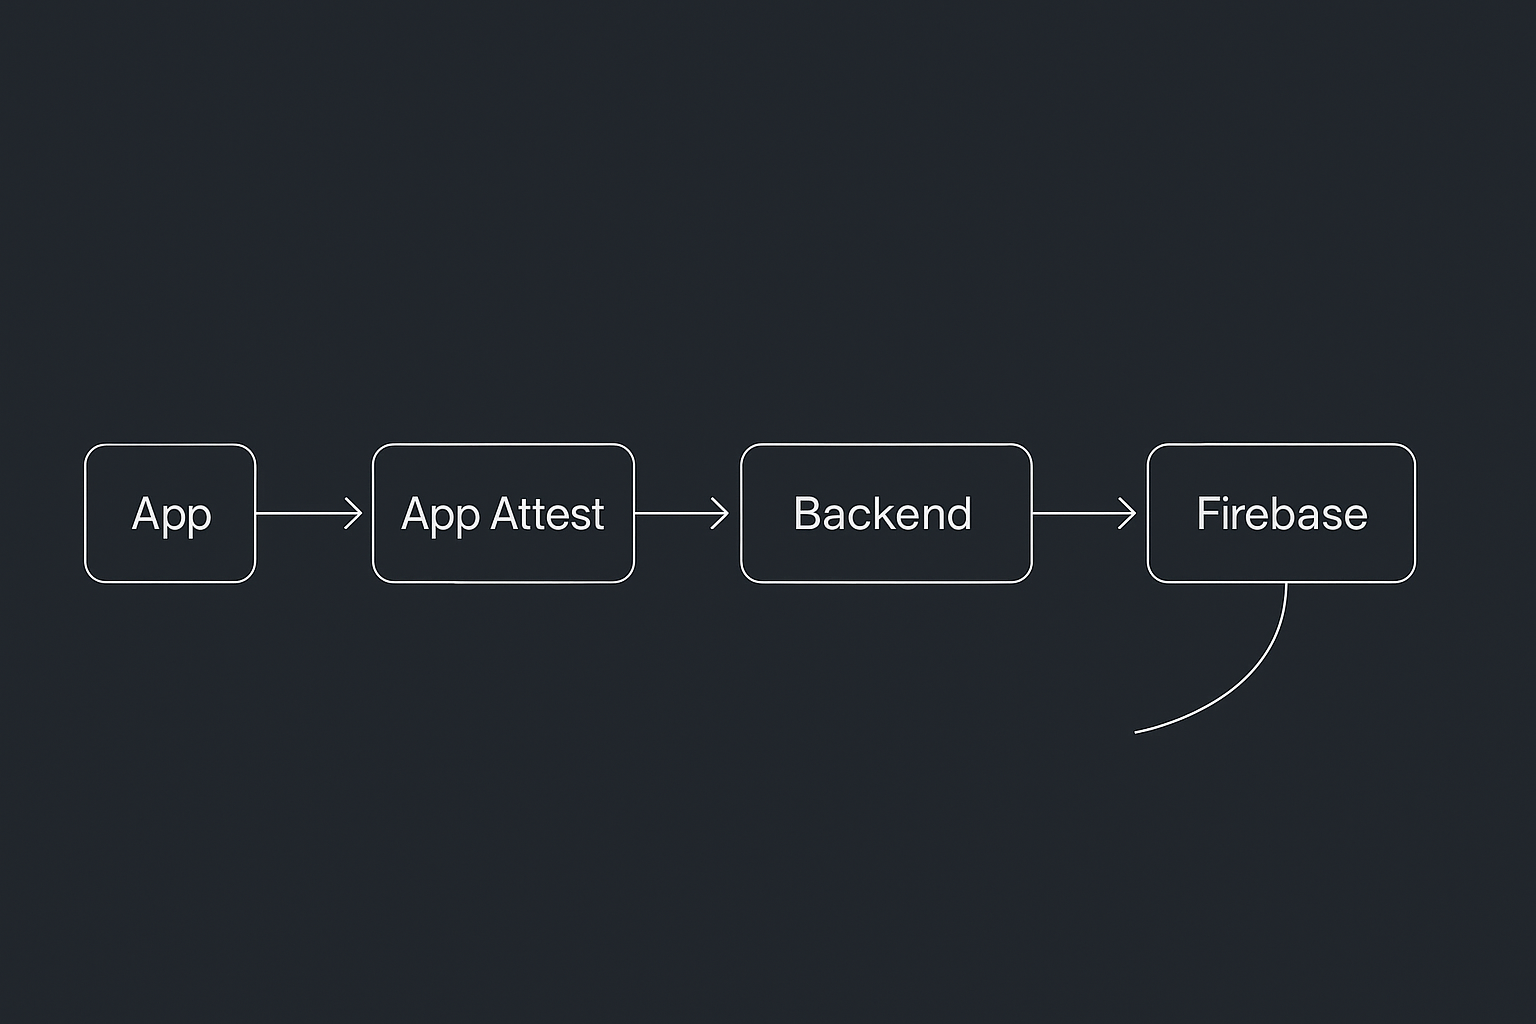
This post walks through FlightAttestDemo, an iOS 18+ SwiftUI app that layers trust on top of your API calls using:
- App Attest — cryptographic proof your app is legit
- DeviceCheck — lightweight device trust signals
- Firebase — a controlled channel for delivering content only verified clients should ever see
You’ll see how these pieces work together, how to build the Swift side, how to set up a Node backend, and how to deal with the weird corners Apple leaves for us to trip over.
1. Why App Attest and DeviceCheck Matter
You don’t need to run a bank to need trust. Any backend with authenticated endpoints, rate limits, in-app purchases, rewards, or moderation benefits from knowing:
When a request comes in, your backend is quietly asking a few important questions.
First, it wants to know whether the call is truly coming from your app or from some patched, repackaged wannabe pretending to be the real thing.
- App Attest answers with hardware-backed certainty, proving the app calling home is the real build you shipped and not some weekend remix stitched together by a curious stranger.
Then it wonders about the device itself — whether it’s clean, trustworthy, or being used for weekend science-fair experiments that you definitely didn’t approve.
And finally, it considers the device’s history with your service: is this a first-time visitor, a long-time regular, or a repeat offender who’s already caused drama?
- DeviceCheck steps in for the second and third questions, giving you a quiet way to understand how a device behaves across time — whether it’s clean, questionable, or already known to your service.
And Firebase? That’s the bouncer at the front door, only letting traffic through when the attestation and device history line up the way they should.
2. App Attest Without the Boring Bits
App Attest generates a keypair tucked inside the Secure Enclave. Apple signs the key and hands you an attestation object you ship to your server.
The core rhythm goes like this:
- Generate a key (your app’s little passport)
- Request attestation (Apple signs that passport)
- Create assertions (prove that the passport hasn’t been forged)
Your backend verifies the attestation once. After that, assertions keep the party going.
No drama. No crypto acrobatics. Just a crisp, no-BS handshake backed by hardware that doesn’t care about anyone’s feelings.
3. DeviceCheck: The Quiet Wingman
DeviceCheck gives you two tiny bits of data per device. Doesn’t look like much, but those bits hit harder than you’d expect. It’s useful for:
- Flagging suspicious patterns
- Marking devices with fraud history
- Tracking free trial abuse
- Marking bonus-eligible devices
App Attest proves software integrity. DeviceCheck adds long-term signal. Together they cover your blind spots.
4. When to Use Which
When teams ask whether they should use App Attest, DeviceCheck, or both, it really comes down to understanding what problem each one solves. App Attest is all about software integrity — proving the binary running on the device is the one you shipped, untouched, unpatched, and unmodified. It gives your backend a solid anchor point so you don’t have to guess whether a request came from your actual app or some Frankenstein rebuild.
DeviceCheck sits in a different lane. It gives you a tiny, persistent record that follows the device across reinstalls and updates. You can mark a device after certain events — maybe it redeemed a promotional credit, maybe it tripped a fraud rule, maybe it’s been completely fine. Over time, you build a picture of how that device behaves, which is incredibly helpful for any system that wants to avoid treating every new install like a blank slate.
Put these two signals together and you get something far more complete: a verified app talking to you from a device with a known past. No guesswork. No trying to piece together intent from scattered data. Just a clear, trustworthy checkpoint your backend can rely on.
FlightAttestDemo ties these two pieces together so you can see how they behave as a unified trust layer.
5. Building FlightAttestDemo
We’ll keep this clean and readable — the kind of SwiftUI structure that feels good to ship, looks sharp in a PR, and won’t make you cringe when someone scrolls through it on GitHub. This is the foundation layer, the part of the build where you decide whether the rest of your app feels effortless or chaotic. So we treat it with the same care as a well-planned flight path: clear intent, no unnecessary turbulence, and just enough polish to make the whole thing feel like it belongs in a real project.

A. Project Setup
Enable Capabilities
In your app’s Signing & Capabilities tab, enable:
- App Attest
- DeviceCheck
- Push Notifications (for Firebase messaging)
- Keychain Sharing (if you want to track attestation key usage)
Add Firebase
import FirebaseCore
import FirebaseMessaging

@main
struct FlightAttestDemoApp: App {
    init() {
        FirebaseApp.configure()
    }
    var body: some Scene {
        WindowGroup {
            ContentView()
        }
    }
}
B. SwiftUI Flow
struct ContentView: View {
    @State private var viewModel = AttestViewModel()

    var body: some View {
        VStack(spacing: 24) {
            Text("Flight Attest Demo")
                .font(.largeTitle.bold())
            Button("Perform App Attest") {
                Task { await viewModel.performAttestation() }
            }
            Text(viewModel.statusMessage)
                .foregroundStyle(.secondary)
                .padding()
        }
        .padding()
    }
}
C. App Attest ViewModel
import Foundation
import DeviceCheck

@Observable
class AttestViewModel {
    var statusMessage = "Waiting…"
    private let appAttest = DCAppAttestService.shared
    private let serverURL = URL(string: "http://localhost:3000/attest")!
    // For a real device, switch localhost to your Mac's IP:
    // private let serverURL = URL(string: "http://192.168.1.23:3000")!

    func performAttestation() async {
        guard appAttest.isSupported else {
            statusMessage = "App Attest not supported."
            return
        }
        do {
            let keyID = try await appAttest.generateKey()
            let challenge = try await fetchChallenge()
            let attestation = try await appAttest.attestKey(keyID, clientDataHash: challenge)
            try await sendAttestationToServer(keyID: keyID, attestation: attestation)
            statusMessage = "Attestation complete."
        } catch {
            statusMessage = "Error: \(error.localizedDescription)"
        }
    }

    private func fetchChallenge() async throws -> Data {
        let (data, _) = try await URLSession.shared.data(from: URL(string: "http://localhost:3000/attest/challenge")!)
        return data
    }

    private func sendAttestationToServer(keyID: String, attestation: Data) async throws {
        var req = URLRequest(url: serverURL)
        req.httpMethod = "POST"
        req.setValue("application/json", forHTTPHeaderField: "Content-Type")
        let payload = [
            "keyId": keyID,
            "attestation": attestation.base64EncodedString()
        ]
        req.httpBody = try JSONSerialization.data(withJSONObject: payload)
        _ = try await URLSession.shared.data(for: req)
    }
}
D. DeviceCheck Token
func fetchDeviceToken() async throws -> String {
    let token = try await DCDevice.current.generateToken()
    return token.base64EncodedString()
}
6. Node.js Backend (Express)
Let’s spin up the backend — the part that always feels a little like popping the hood on an old airplane. You don’t need a fully-armed production setup here; you just need something honest and straightforward that shows the handshake doing its job. This tiny server isn’t trying to win style points — it’s just the ground crew making sure your attestation payloads land cleanly before your app taxis into the rest of the workflow.
Install:
npm install express body-parser
Server Skeleton
const express = require("express");
const crypto = require("crypto");
const bodyParser = require("body-parser");

const app = express();
app.use(bodyParser.json());
Challenge Endpoint
app.get("/attest/challenge", (req, res) => {
  const challenge = crypto.randomBytes(32);
  res.send(challenge);
});
Attestation Endpoint
app.post("/attest", (req, res) => {
  console.log("Attestation received:", req.body);
  res.send("OK");
});
6.5 Running the Node Server (So the App Has Something Real to Talk To)
This tiny backend isn’t meant to impress anyone — it’s just the ground crew making sure the attestation handshake has a safe place to land.
Here’s how to get it running locally:
# Initialize a Node project:
npm init -y
# Install the dependencies:
npm install express body-parser
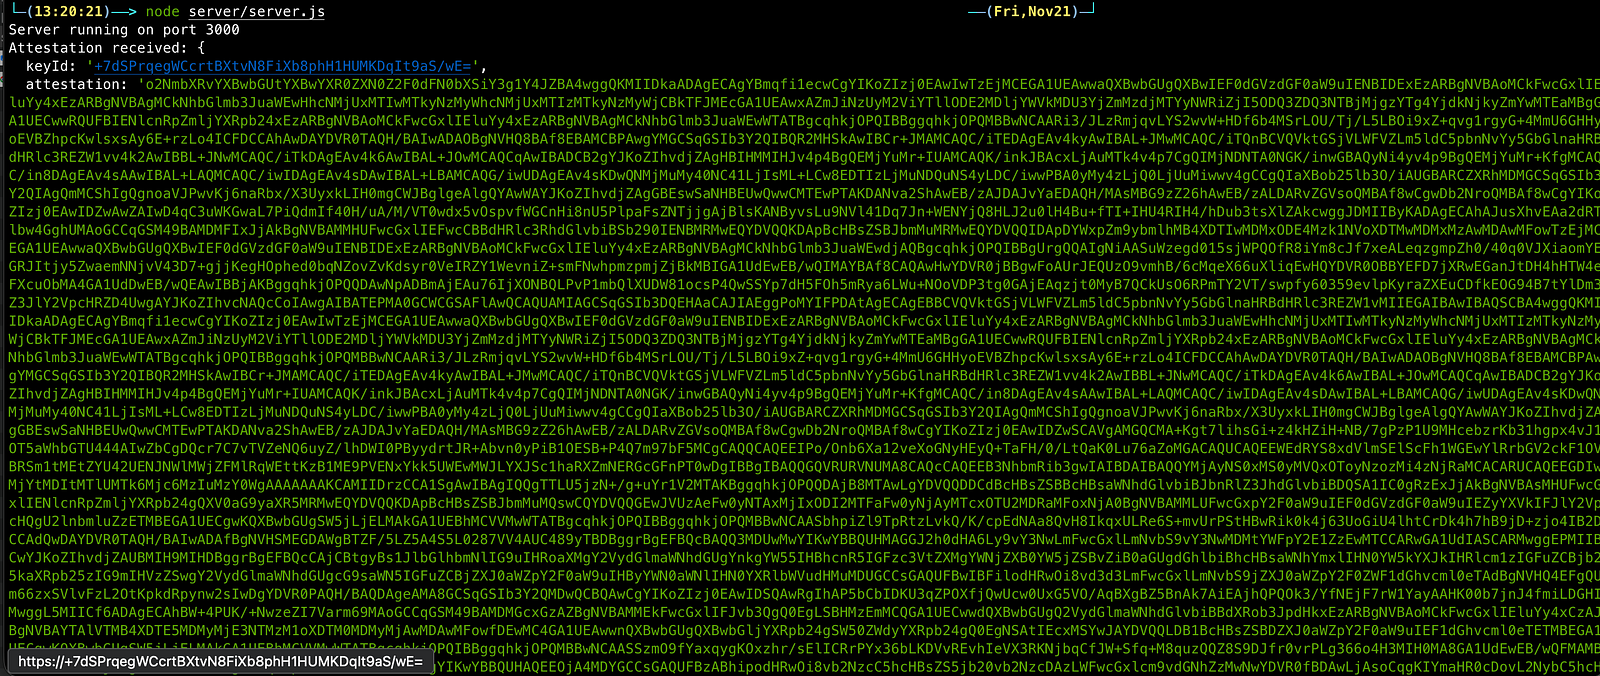
# Start the server:
node server.js
And every time the app performs attestation, you’ll catch a log like:
Attestation received: { keyId: "...", attestation: "..." }
7. Complete End-to-End Verified Request Flow
App Attest gives you the initial trust handshake, but assertions are how you maintain trust over time.
Step 1 — Generate an assertion in SwiftUI
func generateAssertion(keyID: String) async throws -> Data {
    let clientHash = SHA256.hash(data: "protected-endpoint".data(using: .utf8)!)
    return try await appAttest.generateAssertion(
        keyID,
        clientDataHash: Data(clientHash)
    )
}
Step 2 — Send it to a protected backend route
var request = URLRequest(url: serverURL.appendingPathComponent("protected"))
request.httpMethod = "POST"
request.setValue("application/json", forHTTPHeaderField: "Content-Type")

request.httpBody = try JSONEncoder().encode([
    "keyId": keyID,
    "assertion": assertion.base64EncodedString(),
    "deviceToken": try await fetchDeviceToken()
])

let (data, _) = try await URLSession.shared.data(for: request)
return data
Step 3 — Backend verifies assertion + DeviceCheck before responding
app.post("/protected", async (req, res) => {
  const { keyId, assertion, deviceToken } = req.body;

  // Here you'd:
  // 1. Verify the assertion
  // 2. Validate DeviceCheck bits
  // 3. Return restricted content

  res.json({
    headline: "Trusted content unlocked.",
    tips: [
      "Your app passed verification.",
      "DeviceCheck token accepted.",
      "Assertions validated."
    ]
  });
});
8. Weird Stuff Apple Doesn’t Warn You About
Simulators? Forget it. They can’t run App Attest.
Restoring a phone? That wipes the attestation key in a way that feels personal.
Users who reinstall constantly? They’ll hit rate limits faster than you expect.
Network retries? They can replay assertions unless you guard against it.
VPNs? Some quietly break DeviceCheck calls in ways that will haunt your QA team.
They don’t tell you these things upfront — you figure them out the way the rest of us did: through confusing logs, half-baked documentation breadcrumbs, and a few “why is this failing only in production?” moments that make you rethink your career choices. But once you’ve been burned by these quirks a couple of times, you start recognizing the patterns and building around them like muscle memory.
9. Polish + Firebase Tie-In
Once attestation succeeds and the server trusts your key, Firebase can safely deliver messages or content specifically meant for verified clients. This lets you keep sensitive or premium data behind a trust layer instead of spraying it across every device that installs your app.
Presenting this in SwiftUI is a chance to make the experience feel cohesive: a boarding-pass-style card once verification succeeds, a taxiway-style progress indicator during attestation, or a subtle nod to classic airline metal when trust is established. You don’t need to overdo it — just enough to make the experience feel intentional.
When App Attest confirms the binary is real, DeviceCheck confirms the device behaves, and Firebase delivers content through a trusted channel, the whole flow lands with the calm confidence of a captain’s final approach call.
Bonus: More Real-World iOS Survival Stories
If you’re into posts like this — the gritty, behind-the-scenes stuff that helps us build stronger apps without losing our sanity — swing by my other work: @wesleymatlock or wesleymatlock.com
These posts are built from real-world debugging nights, a few bruises, and a bunch of small wins. If you have your own stories or questions, feel free to reach out. I’m always down to chat with other builders who care about this craft.
Keep shipping. Keep sharpening. And keep your app honest.