Ever felt like SwiftUI’s built-in shapes just aren’t cutting it? Maybe you’ve wanted to create a unique design or clip an image in a way…
Custom Shapes and Masking in SwiftUI: Tips, Tricks, and Techniques
Ever felt like SwiftUI’s built-in shapes just aren’t cutting it? Maybe you’ve wanted to create a unique design or clip an image in a way that stands out. Custom shapes and masking are powerful tools in SwiftUI that can help you achieve exactly that. In this post, we’ll dive deep into creating custom shapes, using them to mask images, and share some debugging tips along the way.

Introduction to Custom Shapes
SwiftUI’s Shape protocol allows you to create any shape you can imagine by defining a path. This opens up a world of possibilities beyond the standard shapes like rectangles and circles. Custom shapes can enhance the UI of your app, making it more engaging and unique.
Creating Your First Custom Shape
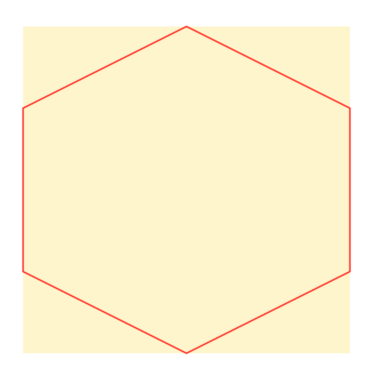
Example: Hexagon Shape
import SwiftUI

struct HexagonShape: Shape {
  func path(in rect: CGRect) -> Path {
    var path = Path()
    let width = rect.width
    let height = rect.height

    path.move(to: CGPoint(x: width * 0.5, y: 0))
    path.addLine(to: CGPoint(x: width, y: height * 0.25))
    path.addLine(to: CGPoint(x: width, y: height * 0.75))
    path.addLine(to: CGPoint(x: width * 0.5, y: height))
    path.addLine(to: CGPoint(x: 0, y: height * 0.75))
    path.addLine(to: CGPoint(x: 0, y: height * 0.25))
    path.closeSubpath()

    return path
  }
}

#Preview {
  HexagonShape()
    .fill(Color.blue)
    .frame(width: 200, height: 200)
}
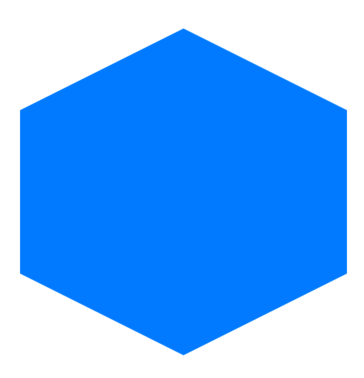
This will render a blue hexagon on the screen. You can customize the fill color and frame size to your liking.
Clipping Images with Custom Shapes
Custom shapes can be used to clip images, creating visually appealing designs. This is where clipShape and mask come into play.
Understanding clipShape vs mask
Both clipShape and mask are modifiers that alter the appearance of views, but they work differently under the hood.
- clipShape: Clips the view to the bounding path of the provided shape. It considers the shape’s vector path and uses it to determine the visible parts of the view.
- mask: Masks the view using the alpha (transparency) values of another view. It overlays the mask view on top of the original view and uses the mask’s alpha channel to determine the visibility.
When to Use clipShape
- Simple Shapes: Use clipShape when you’re working with simple, solid shapes without any transparency.
- Performance: clipShape is generally more performant because it operates on the vector path.
- Geometry-Based Clipping: When you need to clip a view based on geometric shapes (like circles, rectangles, polygons), clipShape is the way to go.
When to Use mask
- Complex Masks: Use mask when you need to apply complex masks that involve gradients, images, or varying levels of transparency.
- Alpha-Based Masking: If your masking shape relies on varying alpha values to create effects like fades or semi-transparent overlays, mask is necessary.
- Layered Effects: When combining multiple views or applying effects that require compositing, mask offers more flexibility.
Benefits and Considerations
clipShape Benefits:
- Performance: Since it uses vector paths, it’s efficient for simple shapes.
- Hit Testing: The clipped view maintains its original hit-testing area unless modified.
mask Benefits:
- Flexibility: Allows for more complex and dynamic masks.
- Transparency Handling: Can create soft edges and gradient masks.
Considerations:
- Performance: mask can be more performance-intensive, especially with complex views.
- Hit Testing: When using mask, the hit-testing area conforms to the non-transparent parts of the mask, which can affect user interactions.
Visual Comparison
Consider an image clipped using both methods:
Using clipShape:
- The image is clipped strictly to the shape’s path.
- No transparency effects are applied.
- Edges are sharp and defined.
Using mask:
- The image is masked according to the mask view’s alpha channel.
- Can include transparency, leading to soft or faded edges.
- Allows for gradient masks and more artistic effects.
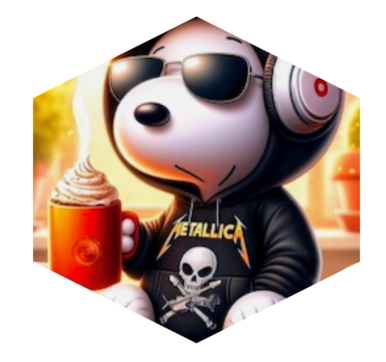
Example: Hexagon-Shaped Image
Using clipShape:
  Image("sampleImage")
    .resizable()
    .scaledToFill()
    .frame(width: 200, height: 200)
    .clipShape(HexagonShape())
Using mask:
  Image("sampleImage")
    .resizable()
    .scaledToFill()
    .frame(width: 200, height: 200)
    .mask(
      HexagonShape()
        .frame(width: 200, height: 200)
    )
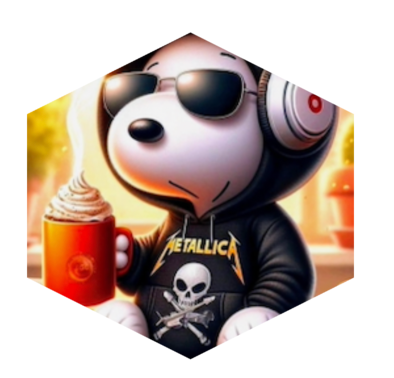
By applying clipShape or mask, the image is clipped to the bounds of our HexagonShape. This technique can be used with any custom shape you design.
Advanced Custom Shapes
Example: Cloud Shape
Let’s create a cloud shape, perfect for weather apps.
import SwiftUI

struct CloudShape: Shape {
  func path(in rect: CGRect) -> Path {
    var path = Path()

    let bottom = rect.height * 0.8
    let radius = rect.height * 0.2

    path.addArc(center: CGPoint(x: rect.width * 0.2, y: bottom - radius),
                radius: radius, startAngle: .degrees(180), endAngle: .degrees(0), clockwise: false)

    path.addArc(center: CGPoint(x: rect.width * 0.5, y: bottom - radius * 1.5),
                radius: radius * 1.5, startAngle: .degrees(180), endAngle: .degrees(0), clockwise: false)

    path.addArc(center: CGPoint(x: rect.width * 0.8, y: bottom - radius),
                radius: radius, startAngle: .degrees(180), endAngle: .degrees(0), clockwise: false)

    path.addRect(CGRect(x: rect.width * 0.2, y: bottom - radius, width: rect.width * 0.6, height: radius))
    path.closeSubpath()

    return path
  }
}

#Preview {
  CloudShape()
    .fill(
      LinearGradient(
        gradient: Gradient(colors: [.white, .blue]),
        startPoint: .top,
        endPoint: .bottom
      )
    )
    .frame(width: 200, height: 150)
}

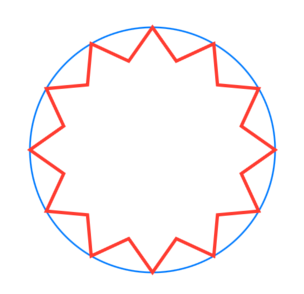
Example: Gear Shape
Creating a gear shape is more complex but rewarding.
import SwiftUI

struct GearShape: Shape {
  var teeth: Int = 8

  func path(in rect: CGRect) -> Path {
    var path = Path()
    let center = CGPoint(x: rect.midX, y: rect.midY)
    let outerRadius = min(rect.width, rect.height) / 2
    let innerRadius = outerRadius * 0.75
    let toothWidth = CGFloat.pi * 2 / CGFloat(teeth * 2)

    for i in 0..<(teeth * 2) {
      let angle = toothWidth * CGFloat(i)
      let radius = (i % 2 == 0) ? outerRadius : innerRadius
      let point = CGPoint(
        x: center.x + radius * cos(angle),
        y: center.y + radius * sin(angle)
      )

      if i == 0 {
        path.move(to: point)
      } else {
        path.addLine(to: point)
      }
    }

    path.closeSubpath()
    return path
  }
}
#Preview {
  GearShape(teeth: 10)
    .stroke(Color.gray, lineWidth: 2)
    .frame(width: 150, height: 150)
}
Animating Custom Shapes
Animating shapes can add a dynamic feel to your app.
Animating the Drawing of a Shape:
struct AnimatedShapeView: View {
  @State private var drawProgress: CGFloat = 0

  var body: some View {
    GearShape(teeth: 12)
      .trim(from: 0, to: drawProgress)
      .stroke(Color.green, lineWidth: 2)
      .frame(width: 150, height: 150)
      .onAppear {
        withAnimation(.easeInOut(duration: 3)) {
          drawProgress = 1
        }
      }
  }
}

This animates the drawing of the gear shape over three seconds.
Debugging Custom Shapes and Masks
Creating custom shapes can sometimes lead to unexpected results. Here are some tips to help you debug.
Visualizing Paths
Use strokes and backgrounds to visualize the path of your shape.
struct DebugHexagonView: View {
  var body: some View {
    HexagonShape()
      .stroke(Color.red, lineWidth: 1)
      .background(Color.yellow.opacity(0.2))
      .frame(width: 200, height: 200)
  }
}
This helps identify any misalignments or unexpected behaviors.
Step-by-Step Construction
Build your shape incrementally, testing each part as you go.
struct StepByStepGearView: View {
  var body: some View {
    ZStack {
      // Outer circle
      Circle()
        .stroke(Color.blue, lineWidth: 1)
        .frame(width: 150, height: 150)

      // Gear shape
      GearShape(teeth: 12)
        .stroke(Color.red, lineWidth: 2)
        .frame(width: 150, height: 150)
    }
  }
}
By overlaying basic shapes, you can see how each part contributes to the final design.
Animation for Debugging
Animating the drawing process can help identify where things go wrong.
struct DebugGearShapeView: View {
  @State private var drawProgress: CGFloat = 0

  var body: some View {
    ZStack {
      // Outer circle
      Circle()
        .stroke(Color.red, lineWidth: 1)
        .frame(width: 150, height: 150)

      GearShape(teeth: 12)
        .trim(from: 0, to: drawProgress)
        .stroke(Color.blue, lineWidth: 2)
        .frame(width: 150, height: 150)
        .onAppear {
          withAnimation(.linear(duration: 5)) {
            drawProgress = 1
          }
        }
    }
  }
}

Watching the shape being drawn can highlight issues in the path.
Technical Interview Insights
Understanding custom shapes and masking can give you an edge in technical interviews. Be prepared to:
- Explain how to implement the Shape protocol.
- Discuss the difference between clipShape and mask.
- Demonstrate debugging techniques for custom shapes.
Interviewers may ask:
• “How do you create a custom shape in SwiftUI?”
• “Can you explain how masking works in SwiftUI?”
• “How would you debug a complex custom shape?”
Being able to articulate these concepts shows deep understanding and problem-solving skills.
Conclusion
Custom shapes and masking unlock a new level of creativity in SwiftUI. They allow you to create unique designs, clip images in interesting ways, and animate paths for dynamic effects. By mastering these techniques, you’ll enhance your apps and stand out in technical interviews.
If you want to learn more about native mobile development, you can check out the other articles I have written here: https://medium.com/@wesleymatlock
🚀 Happy coding! 🚀
By Wesley Matlock on December 5, 2024.
Exported from Medium on May 10, 2025.