Animations in SwiftUI are like riffs in a Metallica song — they set the tone, grab your attention, and elevate the whole experience…
Custom Animations with Timing Curves in SwiftUI: Make Your UI Rock
Animations in SwiftUI are like riffs in a Metallica song — they set the tone, grab your attention, and elevate the whole experience. Default animations? They’re solid, reliable, the “Enter Sandman” of the animation world. But when you need something extra, custom timing curves let you shred.

Today, we’re diving into animations that bring excitement and life to your app. By the time we’re done, your app will bounce, glide, and pop like it’s on stage at a sold-out show. Let’s explore how timing curves can bring motion to life.
Why Timing Curves?
A default animation is like a predictable power chord — it works, but it doesn’t surprise anyone. Timing curves let you inject personality into your animations. Whether it’s a button that feels spring-loaded or a panel that eases into view with purpose, timing curves make your UI interactions memorable.
Enlarge with Animation.interpolatingSpring
Let’s start with a button that enlarges when tapped. This effect feels dynamic, like it’s got a bit of life and energy to it.
import SwiftUI

struct EnlargeButtonView: View {
  @State private var isTapped = false

  var body: some View {
    VStack {
      Button(action: {
        isTapped.toggle()
      }) {
        Text("Enlarge Me")
          .padding()
          .background(Color.blue)
          .foregroundStyle(Color.white)
          .clipShape(Capsule())
          .scaleEffect(isTapped ? 1.2 : 1.0)
      }
      .animation(
        Animation.interpolatingSpring(stiffness: 70, damping: 6),
        value: isTapped
      )
    }
  }
}

#Preview {
  EnlargeButtonView()
}
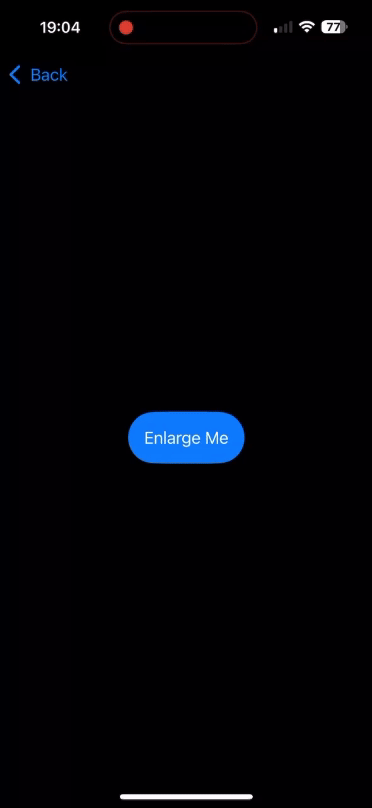
What’s Happening?
• Stiffness: Think of this as how much “force” the spring applies. Lower values make the enlargement more dramatic.
• Damping: This controls how quickly the enlargement settles down. A higher value makes it more restrained.
Want to make it feel like a snare drum hit? Try lowering both stiffness and damping for an exaggerated wobble.
Smooth Glide with Bézier Curves
Bézier curves are your go-to for creating buttery-smooth animations. Imagine a task panel gliding into view, easing in slowly and then accelerating. This effect is both subtle and polished.
import SwiftUI

struct GlidePanelView: View {
  @State private var isVisible = false

  var body: some View {
    VStack {
      Button("Toggle Panel") {
        isVisible.toggle()
      }
      .padding()

      Rectangle()
        .fill(Color.green)
        .frame(width: 300, height: 200)
        .offset(x: isVisible ? 0 : -400)
        .animation(
          Animation.timingCurve(0.25, 0.1, 0.25, 1.0, duration: 1.0),
          value: isVisible
        )
    }
  }
}

#Preview {
  GlidePanelView()
}

Breaking It Down
- Control Points: (0.25, 0.1, 0.25, 1.0) tweak how the animation eases in and out. Adjust these for sharper or gentler effects.
- Duration: This defines how long the animation lasts. Shorter durations feel snappy; longer ones feel deliberate.
Shake with Oscillating Animation
Shaking animations are great for error feedback. Let’s create an effect where an input field shakes side-to-side if validation fails.
import SwiftUI

struct ShakeEffectView: View {
  @State private var isError = false
  @State private var name: String = ""

  @State private var shakeOffset: CGFloat = 0 // Tracks the shake offset

  var body: some View {
    VStack {
      TextField("Enter Name", text: $name)
        .padding()
        .background(Color.white)
        .cornerRadius(8)
        .offset(x: shakeOffset) // Apply the shake offset
        .animation(.spring(response: 0.3, dampingFraction: 0.4), value: shakeOffset) // Smooth spring animation
        .textFieldStyle(RoundedBorderTextFieldStyle())

      Button("Validate") {
        if name.isEmpty {
          // Trigger the shake animation
          withAnimation {
            shakeEffect()
          }
        } else {
          // Reset the shake and clear error
          shakeOffset = 0
          isError = false
        }
      }
      .padding()
    }
    .padding()
  }

  private func shakeEffect() {
    withAnimation(Animation.default) {
      shakeOffset = -10
    }

    DispatchQueue.main.asyncAfter(deadline: .now() + 0.1) {
      withAnimation(Animation.default) {
        shakeOffset = 10
      }
    }

    DispatchQueue.main.asyncAfter(deadline: .now() + 0.2) {
      withAnimation(Animation.default) {
        shakeOffset = 0
      }
    }
  }
}

#Preview {
  ShakeEffectView()
}
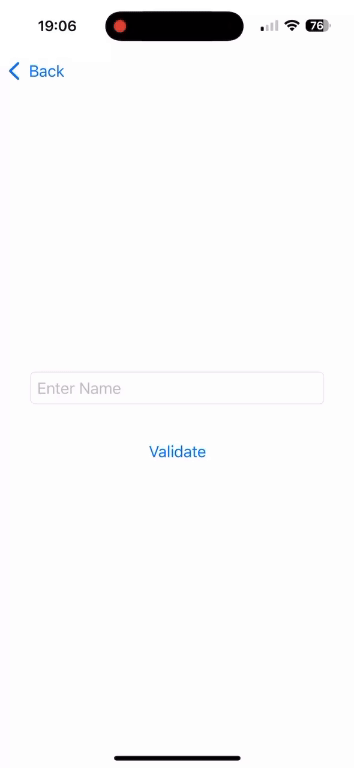
How It Works
- shakeOffset: Tracks the horizontal offset applied to the TextField for the shaking effect.
- shakeEffect(): Animates the shakeOffset property through a sequence of quick movements:
- Moves left (-10)
- Moves right (10)
- Returns to center (0)
- Animation: A .default animation ensures the shake is snappy and responsive.
Button Press with Custom Timing Curve
Now, let’s get fancy. We’ll combine scaling and rotation to create a button press animation that feels tactile and fun.
import SwiftUI

struct CustomPressButtonView: View {
  @State private var isPressed = false

  var body: some View {
    VStack {
      Button(action: {
        isPressed.toggle()
      }) {
        Image(systemName: "star.fill")
          .resizable()
          .frame(width: 100, height: 100)
          .scaleEffect(isPressed ? 0.8 : 1.0)
          .rotationEffect(.degrees(isPressed ? -10 : 0))
      }
      .animation(
        Animation.timingCurve(0.5, 0.2, 0.7, 0.8, duration: 0.3),
        value: isPressed
      )
    }
  }
}

#Preview {
  CustomPressButtonView()
}
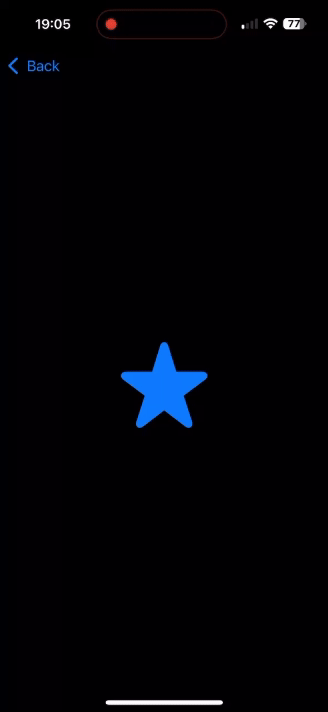
What’s Cool About This?
The button shrinks, tilts, and springs back all in one seamless motion. It’s tactile, like the satisfying click of a mechanical keyboard.
Layering for a Card Flip Effect
Layering animations can produce some seriously cool effects. Let’s build a card that flips and fades simultaneously.
import SwiftUI

struct CardFlipView: View {
  @State private var isFlipped = false

  var body: some View {
    VStack {
      Button(action: {
        isFlipped.toggle()
      }) {
        ZStack {
          if isFlipped {
            Text("Back Side")
              .frame(width: 200, height: 300)
              .background(Color.red)
              .cornerRadius(10)
              .rotation3DEffect(.degrees(180), axis: (x: 0, y: 1, z: 0))
          } else {
            Text("Front Side")
              .frame(width: 200, height: 300)
              .background(Color.blue)
              .cornerRadius(10)
          }
        }
        .foregroundStyle(Color.white)

      }
      .rotation3DEffect(.degrees(isFlipped ? 180 : 0), axis: (x: 0, y: 1, z: 0))
      .animation(.easeInOut(duration: 0.5), value: isFlipped)
    }
  }
}

#Preview {
  CardFlipView()
}
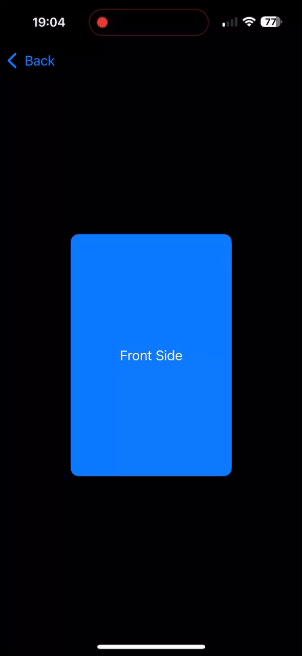
Why This Rocks
The combination of rotation and opacity gives the card flip a polished, professional feel. Bonus points if you add sound effects!
Instruments for Performance
Quick tip: Use Xcode’s Instruments to check for dropped frames. Smooth animations are like clean riffs — if they’re choppy, they ruin the vibe. While we won’t deep-dive into this tool here, it’s your best friend for optimizing animation performance.
Pulling It All Together
• Buttons that bounce and shrink with springy delight.
• Panels that glide into place with cinematic ease.
• Error fields that shake like a wah pedal gone wild.
• Cards that flip with layered polish.
Animations in SwiftUI aren’t just about adding movement — they’re about creating an experience that feels intuitive, engaging, and yes, even a little bit fun. With custom timing curves, you can take your app from functional to unforgettable, turning simple interactions into moments of delight.
Whether it’s a button that bounces like it’s spring-loaded, a panel that glides into view with cinematic precision, or a card that flips with layered polish, the possibilities are endless. And while crafting these animations might feel like fine-tuning a riff in your favorite Metallica song, the payoff is a UI that rocks as hard as your code.
So next time you’re coding, think beyond the default. Experiment. Push the boundaries. Let your app’s animations tell a story. After all, a great animation isn’t just seen — it’s felt.
Stay creative, keep coding, and may your UI always hit the high notes. 🤘
If you want to learn more about native mobile development, you can check out the other articles I have written here: https://medium.com/@wesleymatlock
🚀 Happy coding! 🚀
By Wesley Matlock on December 10, 2024.
Exported from Medium on May 10, 2025.